This guide walks you from creation to publication: all you need is a Google account and photos of your artworks. Allow about ten minutes for a first exhibition.
Note: the application’s interface is currently in French, so the French labels appear in parentheses after the English names.
Before you start
A Google account (Gmail or other). It is the only account required: it identifies you as an artist, and it lets you store your images in your own Google Drive.
Photos of your artworks. A photo taken with a phone is enough: the tool straightens the perspective and crops. A sharp photo in daylight, without glare, works best.
A computer, tablet or phone. Arranging is easier on a computer or tablet; visiting works everywhere.
Nothing to install. Everything happens in the browser.
Open My space (Mon espace) and click Sign in with Google (Se connecter avec Google). You can fill in the form first: Google is only asked for at the moment you create.
Fill in the creation form (details below), then click Create the exhibition (Créer l’exposition).
The exhibition appears in My exhibitions (Mes expositions), with its address. It stays private (only you and your helpers can see it) until you publish it.
The form fields
Type of exhibition
Permanent: yours, with no end date. Temporary: a set period, with other guest artists and an optional opening reception.
Title
The name of your exhibition, shown on the welcome page and on posters.
Artist name
The one displayed under the title. You can sign with a pseudonym.
City
Type it then pick it from the suggestions: it is used to place you on the world map of exhibitions and to show your city’s time and weather.
Address
Suggested from the title. 3 to 40 characters: lowercase letters without accents, digits and hyphens. It must be available; the final address is didier-plumey.fr/expo.html?g=your-address.
Access
Public: listed on the exhibitions page after review. Private: reserved for invited guests (by Google address or by link); it is granted by the site team, has at most 25 hanging spots and keeps its images on the site rather than in your Drive.
Layout and number of artworks
10 artworks: one room. 15: two small rooms. 25: two rooms. 56: four rooms in a loop (50 with two large blocks). You can also choose a large room with full-height cubes that carry paintings on every face. A top view shows the surface of each room.
Hanging type
Picture rail (rods along the wall) or nail and wire.
Decor
Twenty-nine ready-made styles: contemporary gallery, classic museum, the Old Bell Tower of Saint-Palais, loft, family home, winter garden, night gallery, great-museum styles… and nine outdoors (village square, public garden, harbour quay, beach, lakeside, pedestrian street, and in Paris the Place du Tertre, the foot of the Eiffel Tower, the Place des Vosges): the form first asks whether the exhibition is indoors or outdoors. Great-museum styles… You can change everything afterwards.
Good to know Each creator can have one permanent exhibition and two temporary ones. Moderation can raise this limit.
Step 2
Arrange it
In My exhibitions, click Enter (Entrer): you arrive in your room.
Signed in with your Google account, you see the ✏️ button: it opens Arrange mode (mode Aménager). (On the exhibition’s welcome page, “Sign in with Google” recognizes you if needed.)
A bar offers 🎨 Walls, floor and ceiling (Murs, sol et plafond) and 🪑 Furniture (Mobilier). The ⚙️ Settings button (Paramètres, ☰ menu) gathers the options.
🎨 Walls, floor, ceiling
Choose a material per room and per surface: parquet, brick, damask silk, concrete, wood paneling… or any color.
Ceiling tab: the lighting (track spots, neon, pendant, chandelier, LED strip), its brightness and tint.
The change shows immediately, with no reload.
🪑 Furniture
The library is sorted into categories: furniture, lighting, decoration, connected devices, for your visitors, animals.
Place a piece by aiming at the floor, then click it to rotate it (R key, in 15° steps), move it or remove it.
Placement aids: magnet 🧲 to walls, 50 cm grid, top view, undo (Ctrl+Z).
Settings (style, size, material) are chosen from 3D thumbnails. Forty pieces of furniture at most.
⚙️ Settings
Options for your visitors: “Like”, visitors’ photos, guestbook.
Colors of the welcome page, title font (fourteen to choose from).
Exhibition image: the artwork that represents it on the exhibitions page.
Events, helpers for arranging.
🔄 Change the decor
In Edit exhibition (Modifier l’exposition) for an exhibition (My space), you can keep the current arrangement or apply another ready-made decor. Warning: the whole current arrangement is then lost; a warning and a confirmation remind you of it.
Full guide Placing furniture in free mode or top view, with filmed demonstrations: the arrangement guide →
Tip When you leave Arrange mode after moving furniture, the page reloads so that obstacles are taken into account.
Step 3
Hang your artworks
In Arrange mode, the empty spots appear as dotted outlines with their number (“+ 3”). Get close (within 4 meters) and click one.
In the Hang an artwork window (Accrocher une œuvre), upload the photo (from the phone’s camera, or a file).
Crop: place the four corners on the edges of the artwork; a magnifier helps you be precise. The tool straightens the perspective: a photo taken at an angle becomes a perfectly straight image. You can also rotate it.
Enter the title, year, technique (the wall label text) and the actual dimensions. They stay tied to the photo’s proportions, and the spot’s maximum size is checked.
Choose the frame: no frame, wood, black, white or gilt.
Confirm: the page reloads on the hung artwork. To fix it, click it then Edit or remove (Modifier ou retirer) in its wall label.
Without 3D: hang on the plan
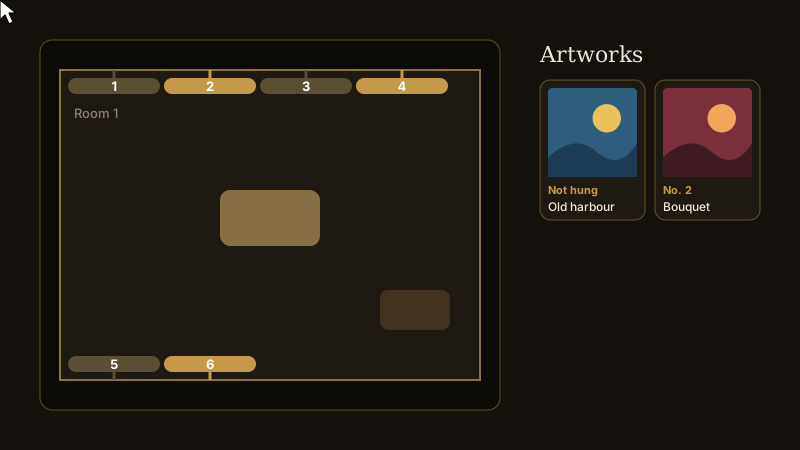
Not comfortable moving around the room in 3D? In “My space” (Mon espace), the 🗺️ Accrocher sur le plan button opens your exhibition seen from above, with its numbered hooks, and the list of your artworks beside it.
Drag an artwork or a photo onto a hook of the plan: it’s hung.
Click a number on the plan to put a photo there (from your device, Google Photos or the reserve), then fill in the label.
Drag and drop a photo from your computer onto a hook: the free hooks blink, and its window opens with the photo. On the floor of a room, it goes to the artworks not hung.
Several photos at once (from your device, Google Photos or your Google Drive): you then choose the hook for each one.
Drag an artwork from the list onto a hook to hang or move it there (two artworks swap places), or onto the floor to take it down.
Each hook is drawn on the side of the wall where the artwork will be seen; on a cube, one hook per face.
Your images stay with you, in your Google Drive
For a public exhibition, your photos are stored in your Google Drive, in a folder named “Exposition – title”. The site only keeps small thumbnails; the high-definition image is read from your Drive when a visitor looks closely at the artwork.
At the first upload, Google asks for your permission to access this folder (valid for one hour). You can revoke it at any time at myaccount.google.com/connections.
The folder must stay shared as “Anyone with the link”, Viewer role, otherwise visitors see empty frames. If you remove this sharing, the artworks reappear as soon as you restore it.
The site records a fingerprint of each image: if you replace a file in your Drive without going through the site, it flags it to the team, who validate the new image.
A private exhibition keeps its images on the site, not in the Drive.
Going faster
The reserve: artworks not yet hung wait there; you hang them at your own pace. “Several photos” (Plusieurs photos) sends everything to the reserve at once.
Instead of an artwork, a spot can hold an event poster, a drawing mirror, a chalkboard or the visitors’ photo board (“✨ Something else to hang” menu, Autre chose à accrocher).
The ?accroche=N link opens spot no. N directly in Arrange mode.
Step 4
Publish it
Until you publish it, your exhibition is visible only to you, your helpers and the site team. To show it to someone beforehand, invite them as a helper (step 6), or create it as a private exhibition.
In My exhibitions, click Request publication (Demander la publication).
The site team reviews it (a few artworks, the presentation). You are notified of the answer.
Once accepted, it can be published: it joins the exhibitions page, the world map and the brochure racks. You can withdraw it at any time.
If declined, you are given a reason: fix it, then request again.
The badge at the top right of the card shows the status: DraftPublication requestedPublishedNot acceptedHidden.
Good to know If images uploaded by your helpers have not yet been stored in your Drive, publication is blocked: a “Photos from your helpers” window (Photos de vos aides) when you open Arrange mode lets you accept or reject them all.
Step 5
Bring it to life
🔗 Invite people
Copy your exhibition’s link from its card and send it by e-mail, WhatsApp or social media. Your visitors come in without an account.
📅 Events
📅 Events button (Événements): opening, meet-up, guided visit. Public (listed on the welcome page) or private (by link). Your visitors sign up with their first name and add it to their calendar. You see who is coming. Each event has its own poster, to put up in the room.
💬 Visitors
They meet as avatars, chat by message, switch to voice, react (❤️ 👏 😮…) and take photos. Nothing to set up: it is active in every exhibition.
📖 Options
In ⚙️ Settings: “Like” on artworks, visitors’ photos (which you can remove), guestbook (moderated by you). Changing an option requires a reload: click “Finish” (Terminer).
Tip Exhibit together: a temporary exhibition lets you invite other artists by e-mail and assign them spots, with a shared opening reception.
Step 6
Get help
You can entrust part of the work to friends (five helpers at most per exhibition), without giving them your account.
In the exhibition’s card, open 👥 Help with arranging (Aide pour l’aménagement) and enter the person’s Google address.
Choose their roles (one or several) and send them the invitation message.
They sign in to My space with that account and accept under “Help arrange” (Aider à aménager).
Event organizer: creates and manages events and sees who is coming.
You can change their roles or withdraw their access at any time. A helper can neither publish nor delete the exhibition.
Frequently asked questions
I don’t see the ✏️ button in my exhibition.
You are not recognized as the artist. On the exhibition’s welcome page, click 🔑 Sign in with Google (Se connecter avec Google) with the same account as My space, then reopen the page. The session is specific to each address of the site.
Visitors see empty frames instead of my artworks.
Your Google Drive folder is no longer shared, or an image has been deleted. Set sharing back to “Anyone with the link” (Viewer role): the artworks reappear immediately.
Google asks me for Drive permission again.
That is normal: the permission lasts one hour. It is kept in your browser during that time, then requested again with no questions asked.
I can’t hang an artwork on a spot.
Either the spot is too small for the dimensions entered (reduce them or choose a larger spot), or you don’t have the right to (a “photographer” helper doesn’t hang: they add to the reserve).
“Request publication” is greyed out.
Images uploaded by your helpers are waiting to be stored in your Drive: open Arrange mode, and the “Photos from your helpers” window offers them to you.
How do I delete my exhibition?
In the exhibition’s card on My space, use the Delete button (Supprimer): the exhibition and its hung artworks are erased. Your Google Drive files stay with you.
Can I change my exhibition’s address?
The address is chosen at creation. To change it, contact the site team (they can rename an exhibition).
Is it really free?
Yes: creating, arranging, publishing and welcoming visitors costs nothing.
Your turn to play.
Free, no commitment. Your first exhibition could be ready tonight.